E-commerce Implementation in Google Analytics 4
One of the key areas of focus for GA4 is e-commerce, it provides reports and capabilities to help businesses track and optimize their online sales. In this context, e-commerce implementation in GA4 involves setting up and configuring the relevant e-commerce tracking features, such as product impressions, clicks, and purchases, and then using this data to gain insights into user behavior, optimize conversion rates, and improve overall business performance. In this article, we will explore the key steps involved in implementing e-commerce tracking in GA4.
E-commerce Implementation
There are two primary ways that you can implement e-commerce events in google analytics 4.
- Google Tag Manager based
- Google Tag based
A Google Tag based configuration directly send measurement data from javascript on the website to the analytics server. Google Tag Manager based configuration, sends data to google tag manager, which then sends data to the analytics server. This article focuses on using Google Tag Manager based e-commerce implementation.
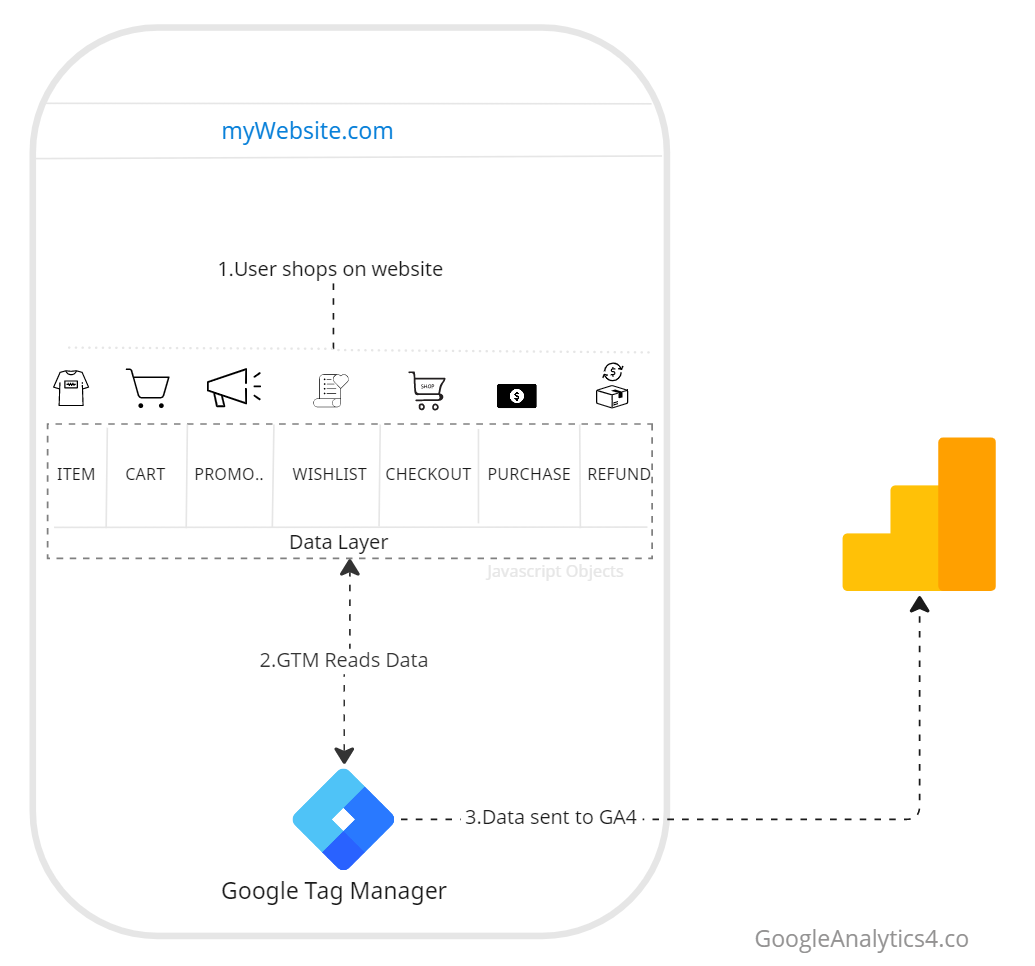
Before going into detail, let us consider the high-level process for implementing google analytics 4 E-commerce capabilities using Tag Manager.

- A User performs certain actions on any E-commerce website. E.g. She views an item ( T-shirt in the above diagram), can view her cart, apply a promo code if available, go to the checkout process, and finally purchase.
- For each of these user actions (events), your website will create javascript code and add it to the data layer. E.g. when a user is viewing an item, your website will populate the data layer with that item’s attributes ( name, brand, price, size, etc). A data layer is a javascript object. Your website may have several javascript objects, but the data layer is just one of them. It is automatically created once you install Google Tag Manager.
- Google tag manager will be listening to these events( user actions) to collect data. E.g. When our user views T-shirt, a javascript object will be populated with its attributes, and at the same time, google tag manager will be notified of the event. It will collect the data from the javascript object and pass it on to Google Analytics servers for processing.
This article intends to simplify explanation of all the steps involved in implementing Google Analytics 4 actions including server-side code examples, data layer code, GTM tags and triggers. To make it comprehensive, I have also provided references for these GA4 actions from official google documentation at the end of each action implementation.
Product Impressions Implementation
A view_item_list event is used to measure impressions when products are displayed on one page. A product category page is one such example, here is an example of view_item_list which we will refer to for implementation. First, we will write the server code in the website to generate DataLayer code, then we will read the DataLayer code using google tag manager and create a tag. This tag will push the data to our google analytics data stream.
1. Server Side Code
There are essentially two steps to server-side code for view_item_list.
- When the product category page loads all products, we create an array to store all the products. The array would also store product attributes e.g. name, id, price, etc. for each product.
- We then pass on this product data using items array to our data layer. The array contains individual products(items) and its associated parameters.
Make sure that a unique item list ID (item_list_id) and a list name (item_list_name) are also passed in the data layer object to identify the product list from others. These attributes can be passed at item level or at the whole category level. When specified at item level, category level item_list_id and item_list_name will be ignored.
Server Side Code Example to Get Product Attributes
//Google Analytics 4 - E-commerce -- Creating DataLayer event for view_item_list
// This example uses woocommerce E-commerce platform .

//Execute our function after product category page has loaded all products
add_action('woocommerce_after_shop_loop', 'ga4_view_item_list_js');

//Actual function to get list of products and create javascript layer
function ga4_view_item_list_js() {
    $product_list = array();
    $loop = new WP_Query(array(
        'post_type' => 'product',
        'posts_per_page' => -1
    ));
// 1. Get All Products meta data from product database e.g. name , id , price etc.
    if ($loop->have_posts()) {
        while ($loop->have_posts()) {
            $loop->the_post();
            global $product;
            $product_name = esc_js($product->get_name());
            $product_id = esc_js($product->get_id());
            $product_price = esc_js($product->get_price());
            $product_brand = esc_js($product->get_meta( '_brand', true ));
            $product_category = "Empty";
            $terms = get_the_terms( $product->get_id(), 'product_cat' );
            $product_category = $terms[0]->name;
            $product_variant = esc_js($product->get_meta( '_variant', true ));

            $product_list[] = array(
                'name' => $product_name,
                'id' => $product_id,
                'price' => $product_price,
                'brand' => $product_brand,
                'category' => $product_category,
                'variant' => $product_variant
            );
        }
    }

    wp_reset_query();

    $currency_code = get_woocommerce_currency();
//2 . Get the existing dataLayer object and populate values from our server to our client side readable data layer.
    echo "
        echo "
    <script>
        window.dataLayer = window.dataLayer || [];
        dataLayer.push({
            'event': 'dl_view_item_list',
            'ecommerce': {
                'currencyCode': '$currency_code',
                'items': ".json_encode($product_list).",
				        'item_list_id': 'product_category',
    			      'item_list_name': 'Product Category Page',
            }
        });
    </script>
    ";
}
2. Data Layer code
Once we have written the server-side code above. We can confirm our data layer state. There are several tools you can use to check what’s being populated on data layer state. In this article, I am using Datalayer checker chrome extension by sublimemetrix.com
To view the content of data layer on any page, click on the Datalayer checker chrome extension icon.
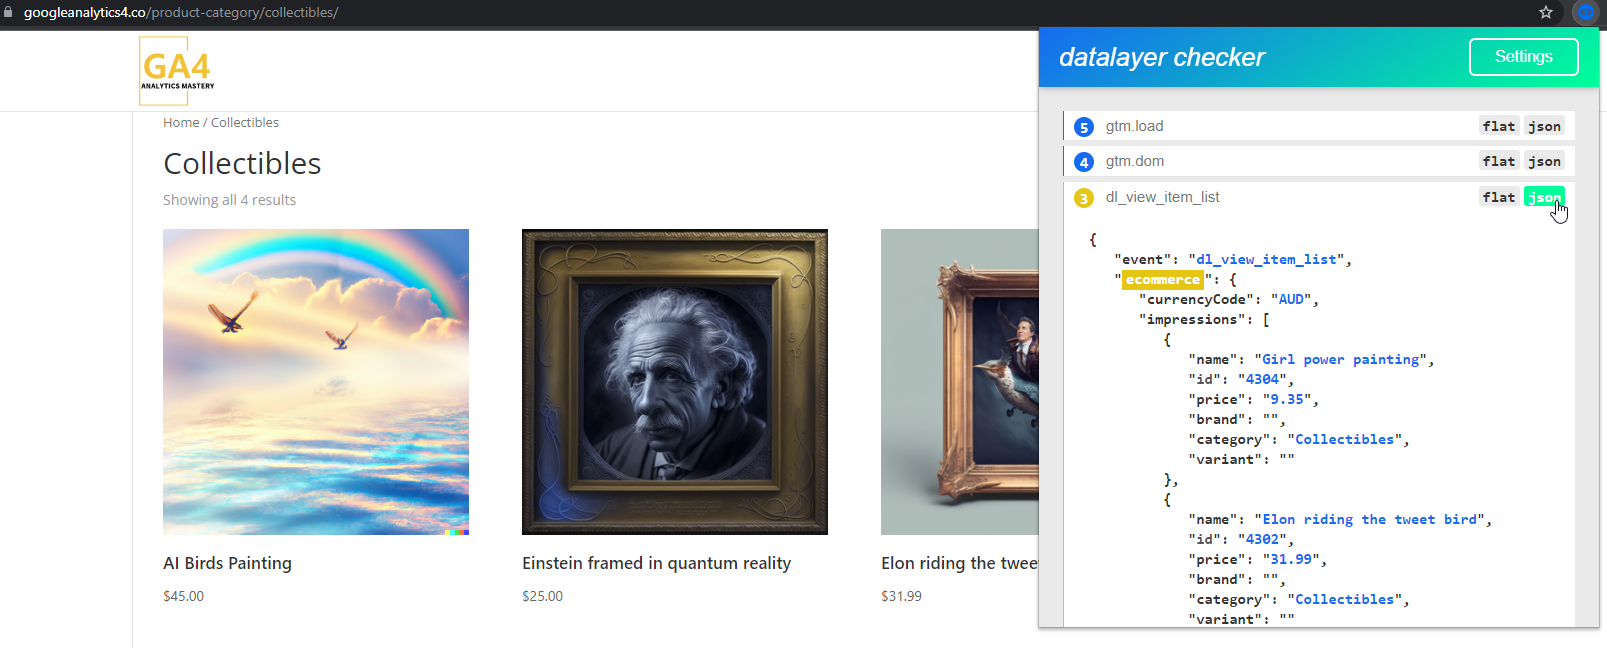
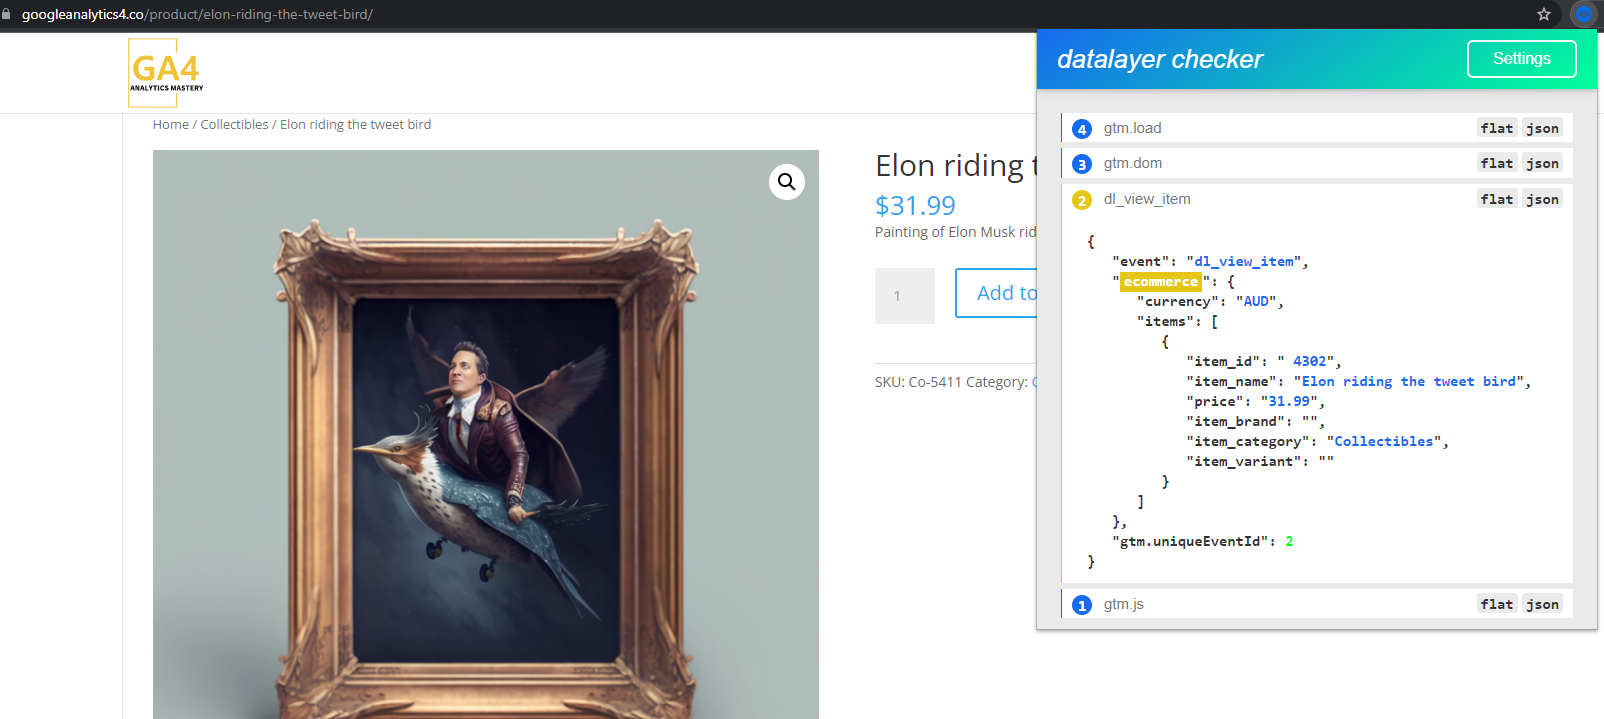
The actual javascript object that is populated in the data layer for product category page is given below. Since we did not populate any value for the brand or variant its value is empty.
Data Layer code
{
   "event": "dl_view_item_list",
   "ecommerce": {
      "currencyCode": "AUD",
      "items": [
         {
            "name": "Girl power painting",
            "id": "4304",
            "price": "9.35",
            "brand": "",
            "category": "Collectibles",
            "variant": ""
         },
         {
            "name": "Elon riding the tweet bird",
            "id": "4302",
            "price": "31.99",
            "brand": "",
            "category": "Collectibles",
            "variant": ""
         },
         {
            "name": "Einstein framed in quantum reality",
            "id": "4168",
            "price": "25",
            "brand": "",
            "category": "Collectibles",
            "variant": ""
         },
         {
            "name": "AI Birds Painting",
            "id": "4156",
            "price": "45",
            "brand": "",
            "category": "Collectibles",
            "variant": ""
         }
      ],
      "item_list_id": "product_category",
      "item_list_name": "Product Category Page"
   },
   "gtm.uniqueEventId": 2
}
3. GTM configuration
So far, we have written server-side code to create product arrays with attributes. And then populated data layer with event “dl_view_item_list” which contains all the products and related information.
We will now use google tag manager ( GTM ) to read the data layer event “dl_view_item_list” and trigger a data push to the google analytics data stream.
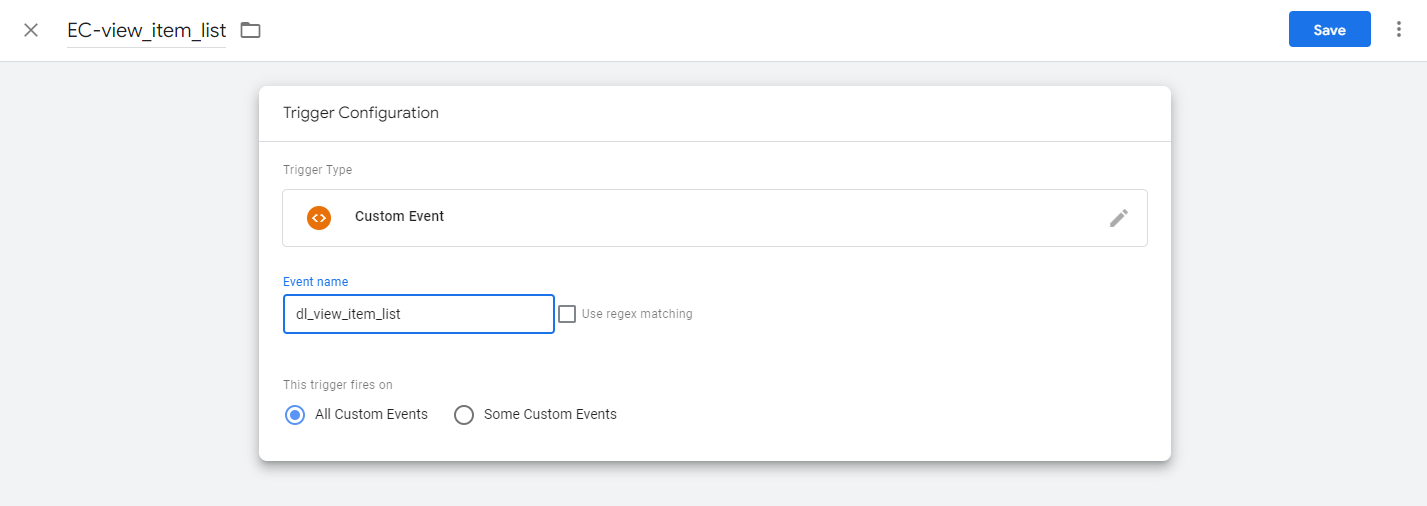
Create trigger
We will create a new trigger that will listen for whenever an event named “dl_view_item_list” is triggered. Once the event appears in our javascript data layer, our associated tag ( which we will create in the next step ) will be executed.
Create data layer variable
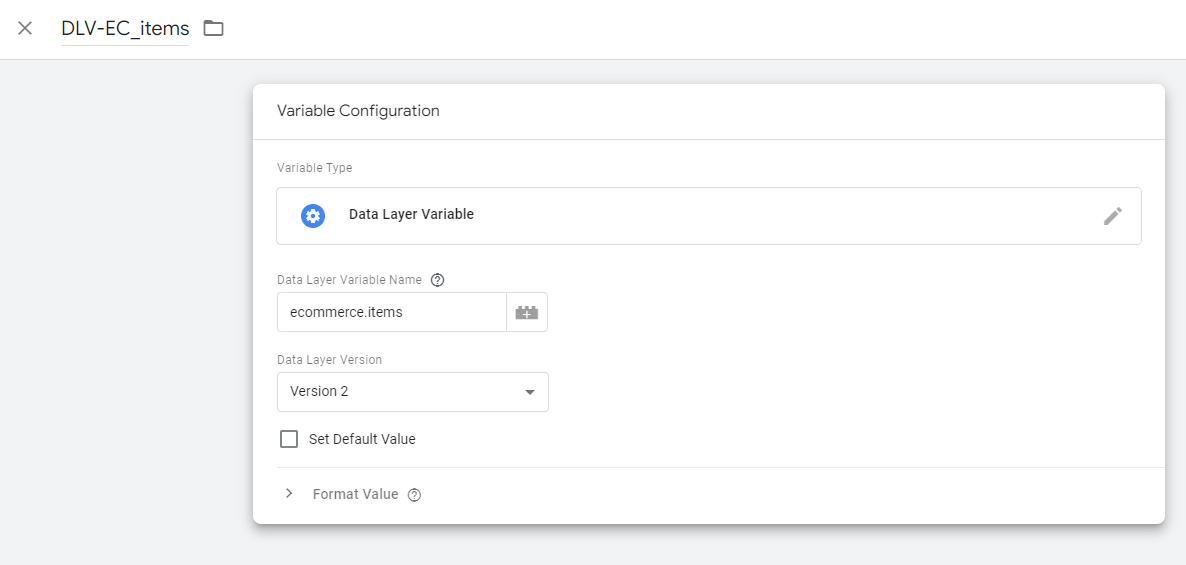
We need a variable in GTM to read the value from our website data layer. We want to read an array which contain all the items. From the image below, we can get that product array by referencing ecommerce.items. This will contain a list of all products on product category page.
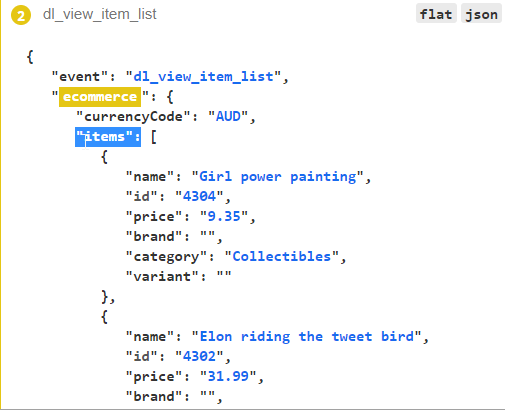
Next, we create a new variable in our google tag manager and configure it to read from ecommerce.items. We have called our GTM variable DLV-EC_items and told it to receive value from ecommerce.items from within the data layer on our website.
Create tag
Now we will create a tag in GTM. Our tag will read the product information from data layer and send that information to google analytics data stream. Our tag configuration will look like the image below.
- We created a tag named GA4-view_item_list
- We configured the code to send data to our GA4 base code ( data stream ).
- We have configured that view_item_list is the event for which we want to send data to google analytics on this tag’s execution.
- Along with the event, we want to send additional parameters of items which will get its value from data layer variable {{DLV-EC_items}} defined above.
- Finally, we have configured the trigger EC-view_item_list which will set our tag to execute as soon as data layer gets an event dl_view_item_list.
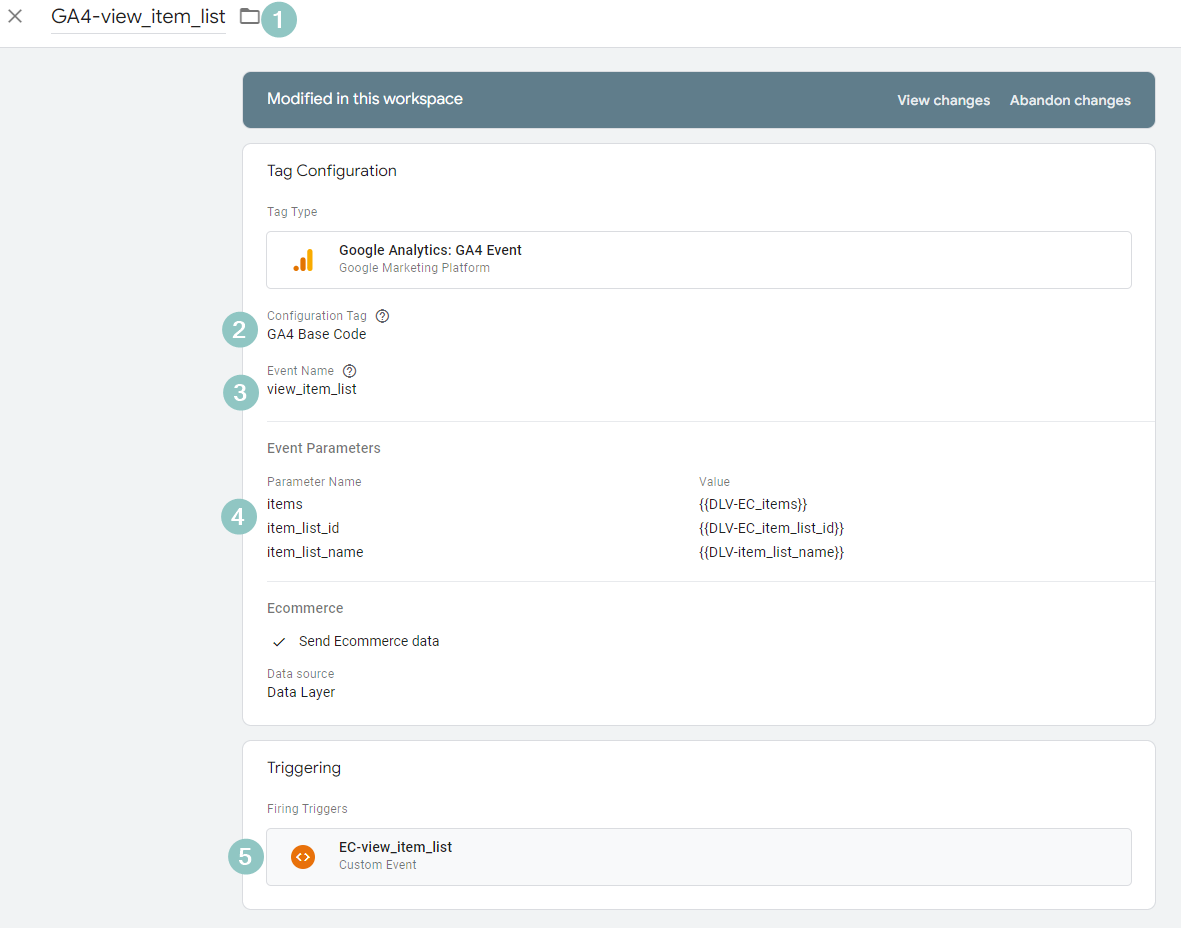
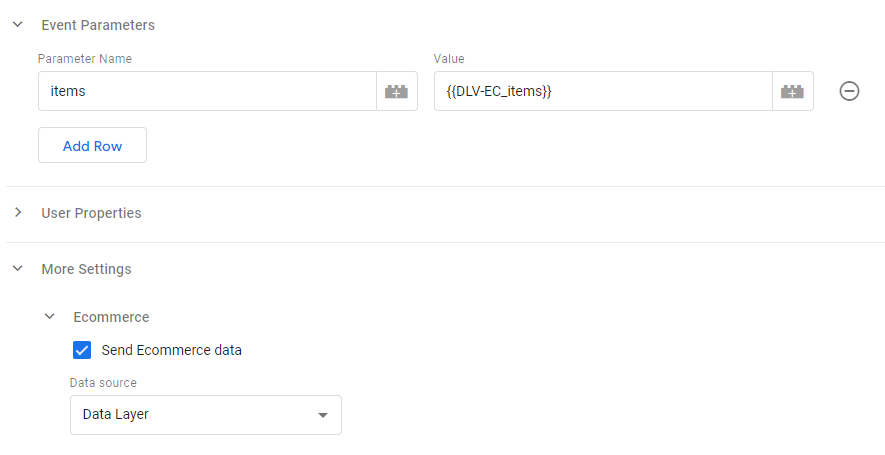
One more setting you will need to activate in the above tag is E-commerce. Under more settings, check the Send E-commerce data option.
Verify the event
Finally, you can verify that the event is being triggered and it is passing the required data to google analytics 4. You can follow this guide to verify the trigger.
Parameter reference view_item_list
The view_item_list event consists of several parameters. The reference is taken from official google documentation and reproduced here for contextual understanding
Parameter reference view_item_list
| wdt_ID | Name | Type | Required | Example value | Description |
|---|---|---|---|---|---|
| 1 | item_list_id | string | No | related_products | The ID of the list in which the item was presented to the user. Ignored if set at the item-level. |
| 2 | item_list_name | string | No | Related products | The name of the list in which the item was presented to the user. Ignored if set at the item-level. |
| 3 | items | Array |
Yes | The items for the event. |
Parameter reference items[]
One special parameter is the items[] array. The items array contains items/product data for each item for which data is being collected. The parameter reference for item[] array is given below
Parameter reference items[]
| wdt_ID | Name | Type | Required | Example value | Description |
|---|---|---|---|---|---|
| 1 | item_id | string | Yes* | SKU_12345 | The ID of the item. *One of item_id or item_name is required. |
| 2 | item_name | string | Yes* | Stan and Friends Tee | The name of the item. *One of item_id or item_name is required. |
| 3 | affiliation | string | No | Google Store | A product affiliation to designate a supplying company or brick and mortar store location. Note: `affiliation` is only available at the item-scope. |
| 4 | coupon | string | No | SUMMER_FUN | The coupon name/code associated with the item. Event-level and item-level coupon parameters are independent. |
| 5 | discount | number | No | 2.22 | The monetary discount value associated with the item. |
| 6 | index | number | No | 5 | The index/position of the item in a list. |
| 7 | item_brand | string | No | The brand of the item. | |
| 8 | item_category | string | No | Apparel | The category of the item. If used as part of a category hierarchy or taxonomy then this will be the first category. |
| 9 | item_category2 | string | No | Adult | The second category hierarchy or additional taxonomy for the item. |
| 10 | item_category3 | string | No | Shirts | The third category hierarchy or additional taxonomy for the item. |
| 11 | item_category4 | string | No | Crew | The fourth category hierarchy or additional taxonomy for the item. |
| 12 | item_category5 | string | No | Short sleeve | The fifth category hierarchy or additional taxonomy for the item. |
| 13 | item_list_id | string | No | related_products | The ID of the list in which the item was presented to the user. If set, event-level item_list_id is ignored. If not set, event-level item_list_id is used, if present. |
| 14 | item_list_name | string | No | Related products | The name of the list in which the item was presented to the user. If set, event-level item_list_name is ignored. If not set, event-level item_list_name is used, if present. |
| 15 | item_variant | string | No | green | The item variant or unique code or description for additional item details/options. |
| 16 | location_id | string | No | ChIJIQBpAG2ahYAR_6128GcTUEo (the Google Place ID for San Francisco) | The physical location associated with the item (e.g. the physical store location). |
| 17 | price | number | No | 9.99 | The monetary price of the item, in units of the specified currency parameter. |
| 18 | quantity | number | No | 1 | Item quantity. If not set, quantity is set to 1. |
Product Detail Views Implementation
A view_item event is useful when we want to pass data on products/items being displayed. We can pass on an array of items. In this example, we will explore view_item in the context when a single product is displayed. For example, on a product display page. Once implemented, we can use this event to report on how much time users spent on product pages, which product was most popular, and so on.
1. Server Side Code
There are two main objectives to be achieved in server-side code for view_item.
- When individual product page loads, get product/item attributes e.g. name, id, price, etc. from our product database.
- Pass on the product data to our data layer by creating javascript as output to our browser.
Given below is the code that I have used on this demo woocommerce website to get product attributes and populate the data layer.
Server-side code example for view_item
//Google Analytics 4 - E-commerce -- Creating DataLayer event for view_item
// This example uses woocommerce E-commerce platform .

//Execute our function after individual product is loaded
add_action('woocommerce_after_single_product', 'ga4_view_item_js');

//Actual function to get list of products and create javascript layer
function ga4_view_item_js() {
    global $product;

//1. Get product meta data from product datbase e.g. name, id, price, etc.
	if (is_product()) {
    $product_name = esc_js($product->get_name());
	$product_id = esc_js($product->get_id());
    $product_price = esc_js($product->get_price());
    $product_brand = esc_js($product->get_meta( '_brand', true ));
    $product_category = "Empty";
	$terms = get_the_terms( $product->get_id(), 'product_cat' );
	$product_category = esc_js($terms[0]->name);
    $product_variant = esc_js($product->get_meta( '_variant', true ));
    $currency_code = get_woocommerce_currency();

//2 . Get the existing dataLayer object and populate values from our server to our client side readable data layer.

        echo "
        <script>
    window.dataLayer = window.dataLayer || [];

    dataLayer.push({
        'event': 'dl_view_item',
        'ecommerce': {
            'currencyCode': '$currency_code',
            'detail': {
                'products': [{
                    'item_name': '$product_name',
                    'item_id': ' $product_id;',
                    'price': '$product_price',
                    'item_brand': '$product_brand',
                    'item_category': '$product_category',
                    'item_variant': '$product_variant'
                }]
            }
        }
    });
</script>
        ";


    }
}
2. Data Layer code
Once we have written the server-side code above. We can confirm our data layer state. As before, we will use the Datalayer checker chrome extension to view the code populated in the data layer.
3. GTM configuration
we have written server-side code to create product arrays with attributes. And then populated data layer with event “dl_view_item_” which contains all the products and related information.
We will now use google tag manager ( GTM ) to read the data layer event “dl_view_item” and trigger a data push to the google analytics data stream
Create trigger
We will create a new trigger that will listen for whenever an event named “dl_view_item” is triggered. Once the event appears in our javascript data layer, our associated tag ( which we will create in the next step ) will be executed.
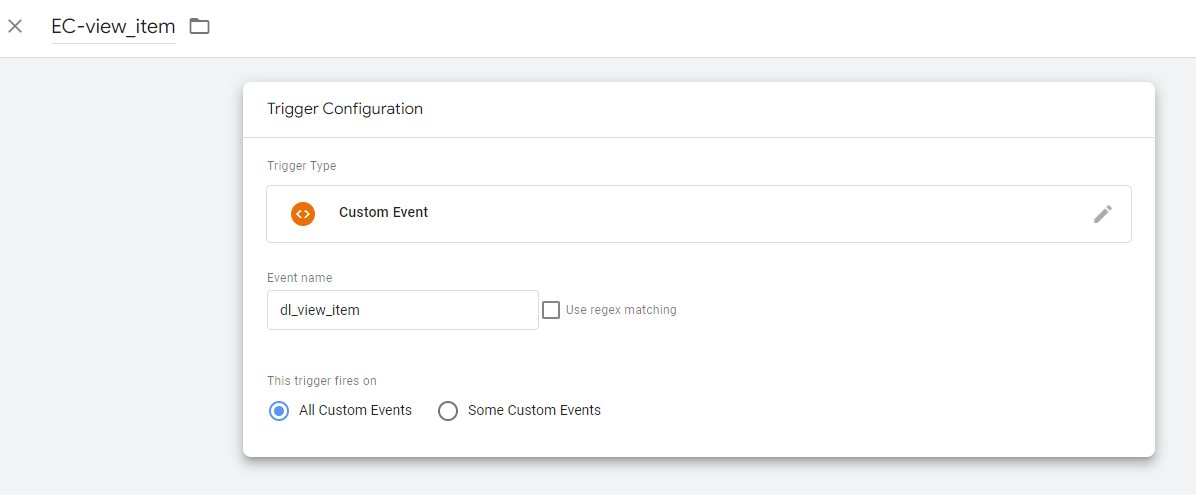
Create Data Layer variable
We can reuse our ecommerce.items variable which contains item data.
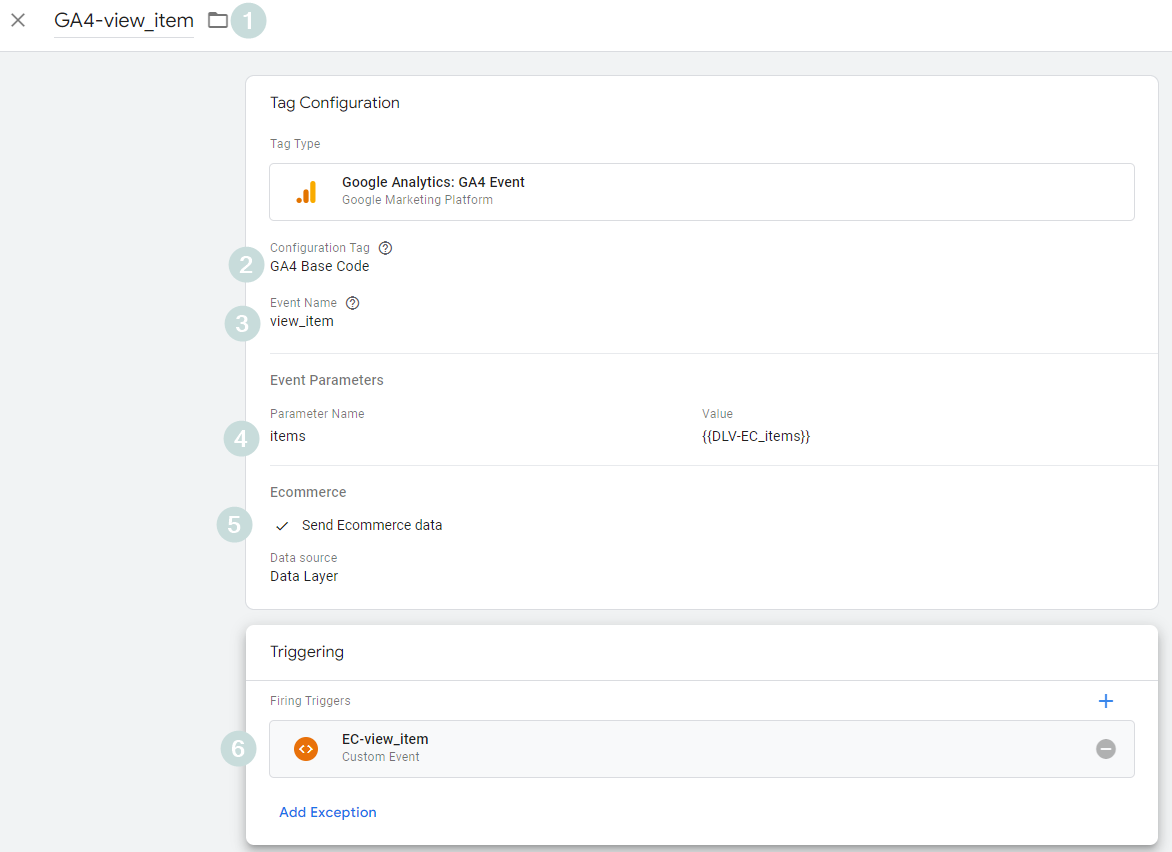
Create tag
Now we will create a tag in GTM. Our tag will read the product information from data layer and send that information to google analytics data stream. Our tag configuration will look like the image below.
- We created a tag named GA4-view_item
- We configured the code to send data to our GA4 base code ( data stream ).
- We have configured that view_item is the event for which we want to send data to google analytics on this tag’s execution.
- Along with the event, we want to send additional parameters of items. These parameters can be obtained from data layer variable {{DLV-EC_items}} defined above.
- Finally, we have configured the trigger EC-view_item_list which will set our tag to execute as soon as data layer gets an event dl_view_item_list.
Verify the event
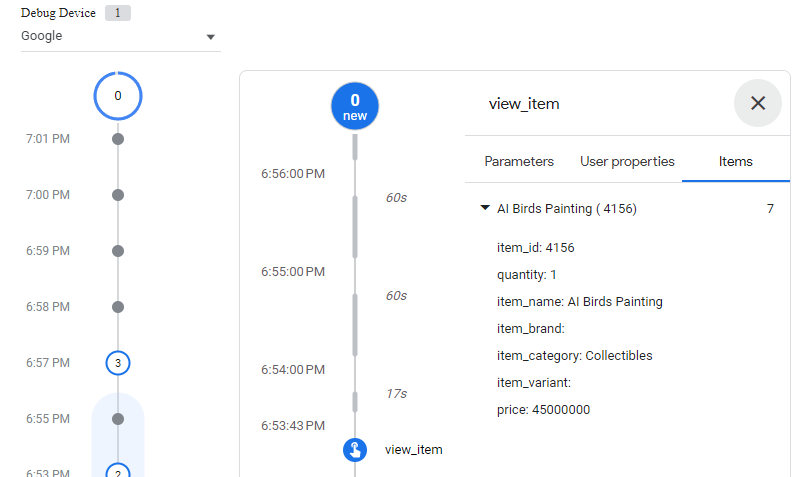
Finally, you can verify that the event is being triggered and it is passing the required data to google analytics 4. You can follow this guide to verify the trigger. A quick glance on the google analytics debug mode shows that data is flowing.
Parameter reference view_item
The parameter reference for view_item is given below. It is taken from the official google documentation and reproduced here for ease of understanding.
view_item Event Parameters
| wdt_ID | Name | Type | Required | Example value | Description |
|---|---|---|---|---|---|
| 1 | currency | string | Yes* | USD | Currency of the items associated with the event, in 3-letter ISO 4217 format. * If you set value then currency is required for revenue metrics to be computed accurately. |
| 2 | value | number | Yes* | 7.77 | The monetary value of the event. * value is typically required for meaningful reporting. If you mark the event as a conversion then it's recommended you set value. * currency is required if you set value. |
| 3 | items | Array |
Yes | The items for the event. |
The parameter reference for item[] array is same as in view_item_list.
Product Clicks Implementation
An event select_item is used to measure product clicks. This event will be triggered whenever a user clicks on a product listing. First, we will write the server code in the website to generate DataLayer code, then we will read the DataLayer code using google tag manager and create a tag. This tag will push the data to our google analytics data stream.
1. Server-side code
There are two steps to server-side code for select_item.
- When the user clicks on a product, we get product attributes from the server and create an array to store product attributes e.g. name, id, price, etc.
- We then pass on this product attribute data to our data layer.
Server-side code for select_item is different from view_item because it helps with product click reporting. A product page can be loaded with a click or without a click( direct page load). Therefore, select_item helps in understanding user behavior on product clicks from the list of products displayed.
Server-side code example to get product attributes
//Google Analytics 4 - E-commerce -- Creating DataLayer event for view_item
// This example uses woocommerce E-commerce platform .
// this example gets few parameters. For complete parameter reference, please see parameter reference section below.

//This action hook fires anywhere the shop loop has loaded. To avoid parsing, we only parse product id from the product class and then send it to server to request product attributes
add_action('woocommerce_after_shop_loop', 'ga4_select_item_js');

function ga4_select_item_js() {
    ?>
    <script type="text/javascript">
        jQuery(document).ready(function($) {
            $('.woocommerce ul.products li.product').on('click', function() {
                var product_id = $(this).attr('class').match(/post-(\d+)/)[1];
                if (product_id) {
                    $.ajax({
                        url: '<?php echo admin_url("admin-ajax.php"); ?>',
                        type: 'POST',
                        data: {
                            action: 'get_product_attributes',
                            product_id: product_id
                        },
                        success: function(response) {
                            if (response.success) {
                                var dataLayer = window.dataLayer || [];
                                dataLayer.push({
                                    'event': 'dl_select_item',
                                    'ecommerce': {
										'item_list_id' :'product_category',
										'item_list_name': 'Product category page',
                                        'items': [{
                                            'name': response.data.product_name,
                                            'id': response.data.product_id,
                                            'price': response.data.product_price,
                                            'brand': response.data.product_brand,
                                            'category': response.data.product_category,
                                            'variant': response.data.product_variant,
                                            'currency': response.data.currency_code
                                        }]
                                    }
                                });
                            }
                        }
                    });
                }
            });
        });
    </script>
    <?php
}

add_action('wp_ajax_get_product_attributes', 'get_product_attributes');
add_action('wp_ajax_nopriv_get_product_attributes', 'get_product_attributes');
function get_product_attributes() {
    if (!isset($_POST['product_id'])) {
        wp_send_json_error('Invalid request');
    }

    $product_id = intval($_POST['product_id']);
    $product = wc_get_product($product_id);
    if (!$product) {
        wp_send_json_error('Invalid product ID');
    }

    $product_name = $product->get_name();
    $product_price = $product->get_price();
    $product_brand = $product->get_meta('_brand', true);
    $product_category = 'Empty';
    $terms = get_the_terms($product_id, 'product_cat');
    if ($terms && !is_wp_error($terms)) {
        $product_category = $terms[0]->name;
    }
    $product_variant = $product->get_meta('_variant', true);
    $currency_code = get_woocommerce_currency();

    wp_send_json_success(array(
        'product_id' => $product_id,
        'product_name' => $product_name,
        'product_price' => $product_price,
        'product_brand' => $product_brand,
        'product_category' => $product_category,
        'product_variant' => $product_variant,
        'currency_code' => $currency_code
    ));
}
2. Data Layer code
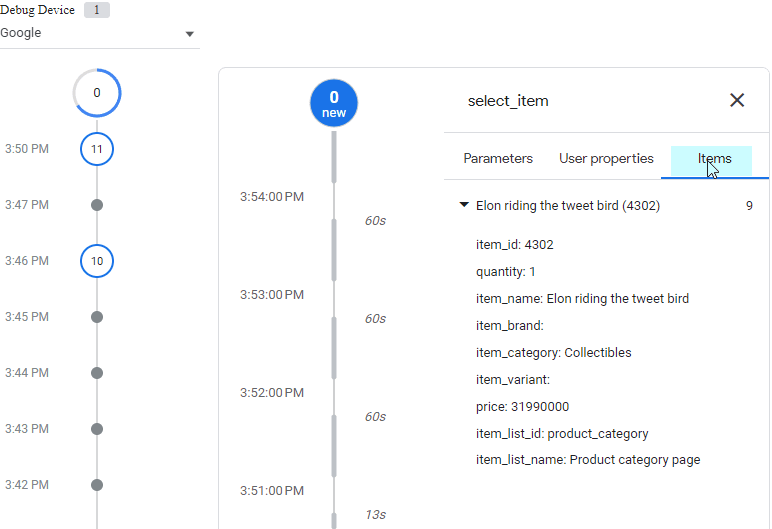
As before, we now need to confirm whether our data layer is receiving an event which we can use to trigger our tag for select_item. This verification is slightly difficult with Datalayer checked extension because as soon as you select the product ( click ) on it, web page is changed. Therefore, we can use Analytics Debugger extension to verify data layer in this case. This extension persists the data layer log state and can show whether our data layer event dl_select_item was triggered on previous page or not.
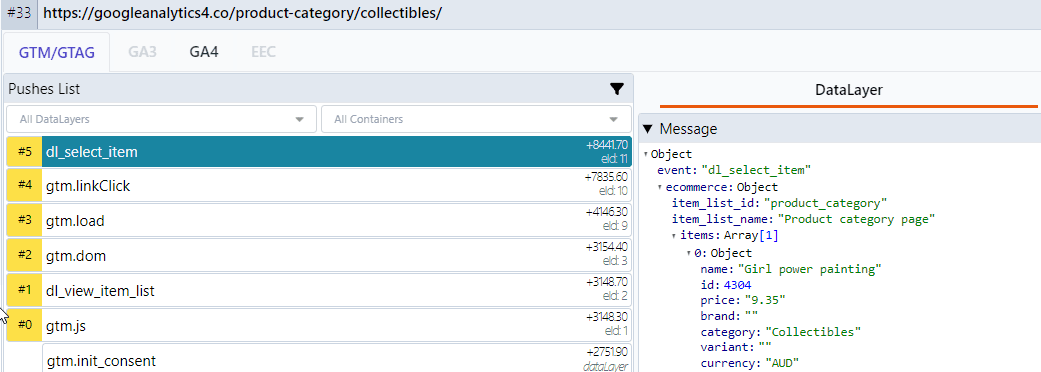
The actual javascript object that is populated in data layer when we selected ( clicked on ) a product is given below.
Datalayer code
{
   "event": "dl_select_item",
   "ecommerce": {
      "item_list_id": "product_category",
      "item_list_name": "Product category page",
      "items": [
         {
            "name": "Einstein framed in quantum reality",
            "id": 4168,
            "price": "25",
            "brand": "",
            "category": "Collectibles",
            "variant": "",
            "currency": "AUD"
         }
      ]
   },
   "gtm.uniqueEventId": 11
}
3. GTM configuration
So far, we have written server-side code to create product arrays with attributes. And then populated data layer with event “dl_select_item” which contains attributes about the product which was clicked
We will now use google tag manager ( GTM ) to read the data layer event “dl_select_item” and trigger a data push to the google analytics data stream.
Create trigger
We will create a new trigger that will listen for whenever an event named “dl_select_item” is triggered. Once the event appears in our javascript data layer, our associated tag ( which we will create in the next step ) will be executed
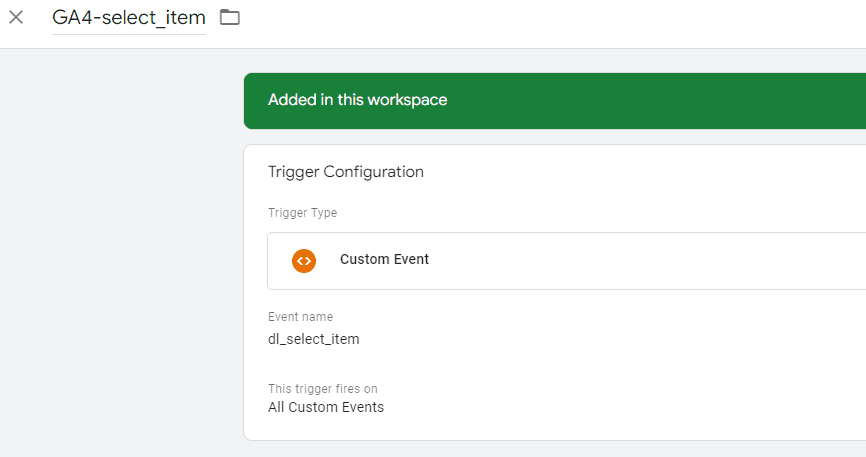
Create data layer variables.
Since, we have already created data layer variables for item_list_id, item_list_name, and items[] array. We can use our existing data layer variables.
Create tag
Now we will create a tag in GTM. Our tag will read the product information from data layer and send that information to google analytics data stream. Our tag configuration will look like the image below.
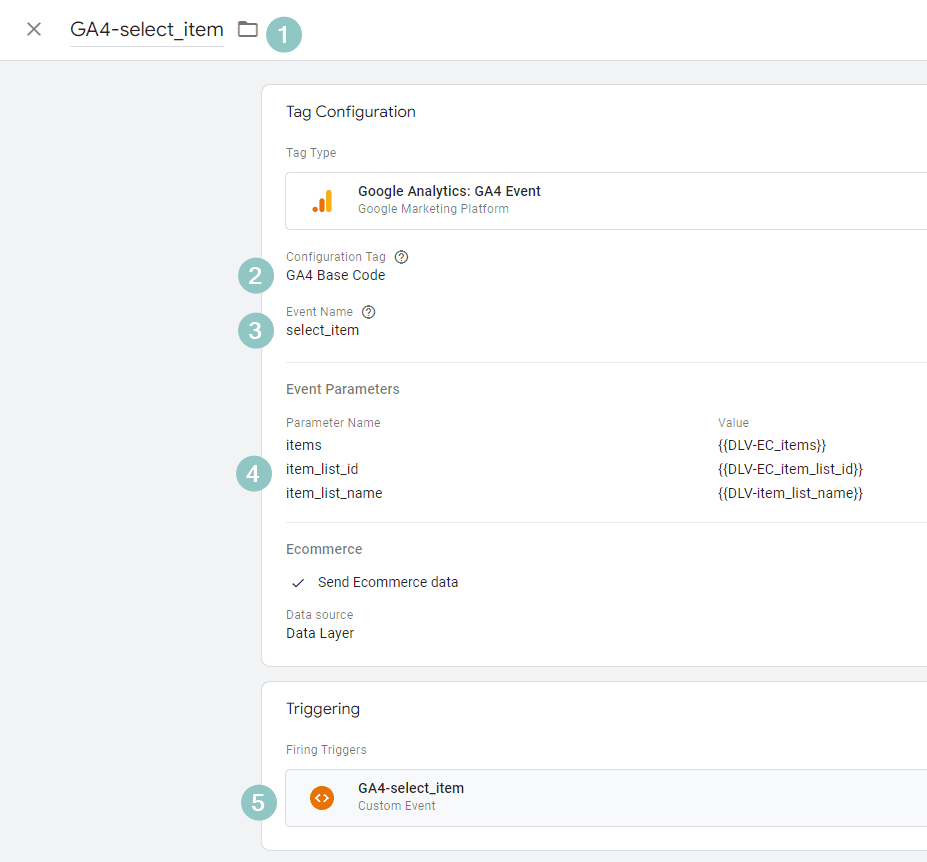
- We created a tag named GA4-select_item
- We configured the code to send data to our GA4 base code ( data stream ).
- We have configured that select_item is the event for which we want to send data to google analytics on this tag’s execution.
- Along with the event, we want to send additional parameters from data layer variable {{DLV-EC_items}}, {{DLV-EC_item_list_id}} and {{DLV-EC_item_list_name}}.
- Finally, we have configured the trigger EC-select_itemwhich will set our tag to execute as soon as the data layer gets an event dl_select_item.
Verify the event
Finally, you can verify that the event is being triggered and it is passing the required data to google analytics 4. You can follow this guide to verify the trigger. A quick glance on the google analytics debug mode shows that data is flowing.
Parameter reference select_item
Parameters for select_item are the same as we used in the view_item_list above.
Parameter reference items[]
Parameters view items[] array are also the same as we used in view_item_list above.
Add to Cart Implementation
The event add_to_cart is used, when a user adds an item to cart. This can be done in more than one way.
- A user clicks on Add to Cart button on a product category page. (e.g. Amazon)
- A user clicks on Add to Cart button on a product detail page.
An important distinction to keep in mind is between how many times the product is added to cart ( button clicked) VS the quantity of the product added e.g. 5 or 10. The number of time user adds is measured by count of add_to_cart event, whereas, quantity of added product is measured from the parameter value quantity inside the items[] array.
Let us go through step by step implementation of add_to_cart event on our demo store.
1. Server-side code
There are essentially two steps to server-side code for add_to_cart.
- When the product detail view page loads, we create an array to store product attributes e.g. name, id, price, etc. for each product.
- We then pass on this product data using items array to our data layer. The array contains individual products(items) and its associated parameters.
Make sure that a unique item list ID (item_list_id) and a list name (item_list_name) are also passed in the data layer object to identify the product list from others. These attributes can be passed at the item level or at the whole category level. When specified at an item level, category level item_list_id and item_list_name will be ignored.
Server-side code example for Adding Products to Cart
//Google Analytics 4 - E-commerce -- Creating DataLayer event for add_to_cart
// This example uses woocommerce E-commerce platform .
// this example gets few parameters. For complete parameter reference, please see parameter reference section below.

//This action hook fires after single product details are triggered and Add to Cart button is shown. To avoid parsing, we only parse product id from the product class and then send it to server to request product attributes
add_action( 'woocommerce_single_product_summary', 'ga4_add_to_cart_js', 25 );


function ga4_add_to_cart_js() {
    global $product;
    ?>
    <script type="text/javascript">
        jQuery(document).ready(function($) {
            $('form.cart').on('submit', function() {
                var product_id = $(this).find('button[name="add-to-cart"]').val();
                var product_qty = $(this).find('input[name=quantity]').val();
                if (product_id) {
                    $.ajax({
                        url: '<?php echo admin_url("admin-ajax.php"); ?>',
                        type: 'POST',
                        data: {
                            action: 'get_product_attributes',
                            product_id: product_id
                        },
                        success: function(response) {
                            if (response.success) {
                                dataLayer.push({
                                    'event': 'dl_add_to_cart',
                                    'ecommerce': {
                                        'currency': response.data.currency_code,
										'item_list_name': 'Product page',
										'item_list_id': 'product_page',
                                        'items': [{
                                            'item_id': response.data.product_id,
                                            'item_name': response.data.product_name,
                                            'item_brand': response.data.product_brand,
                                            'item_category': response.data.product_category,
                                            'item_variant': response.data.product_variant,
                                            'quantity': product_qty,
                                            'price': response.data.product_price
                                        }]
                                    }
                                });
                            }
                        }
                    });
                }
            });
        });
    </script>
    <?php
}
2. Data layer code
As before, we now need to confirm whether our data layer is receiving an event which we can use to trigger our tag for add_to_cart. This verification is slightly difficult with Datalayer checked extension because as soon as you click on the Add to Cart button, web page is changed. Therefore, we can use Analytics Debugger extension to verify data layer in this case. This extension persists the data layer log state and can show whether our data layer event add_to_cart was triggered on previous page or not.
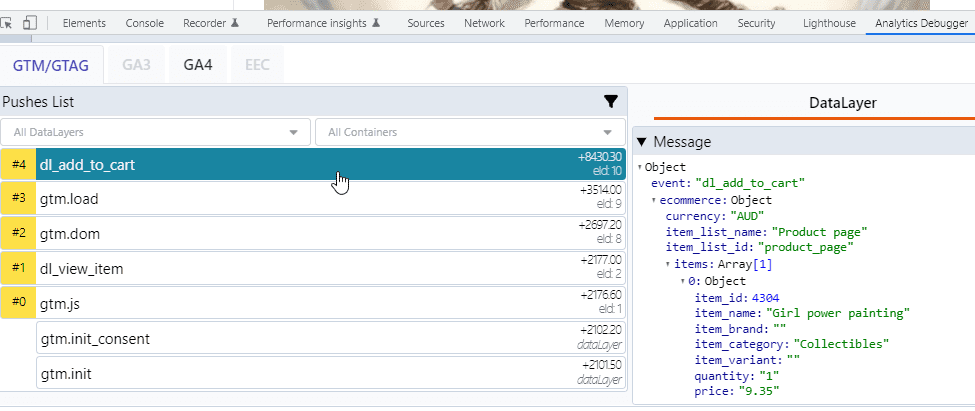
The actual javascript object that is populated in data layer when we selected ( clicked on ) a product is given below
Data layer code for dl_add_to_cart
{
   "event": "dl_add_to_cart",
   "ecommerce": {
      "currency": "AUD",
      "item_list_name": "Product page",
      "item_list_id": "product_page",
      "items": [
         {
            "item_id": 4304,
            "item_name": "Girl power painting",
            "item_brand": "",
            "item_category": "Collectibles",
            "item_variant": "",
            "quantity": "1",
            "price": "9.35"
         }
      ]
   },
   "gtm.uniqueEventId": 10
}
3. GTM configuration
We have written server-side code to create a product array with attributes. And then populated the data layer with event “dl_add_to_cart” which contains attributes for the product which was added to the cart.
We will now use google tag manager ( GTM ) to read the data layer event “dl_add_to_cart” and trigger a data push to the google analytics data stream
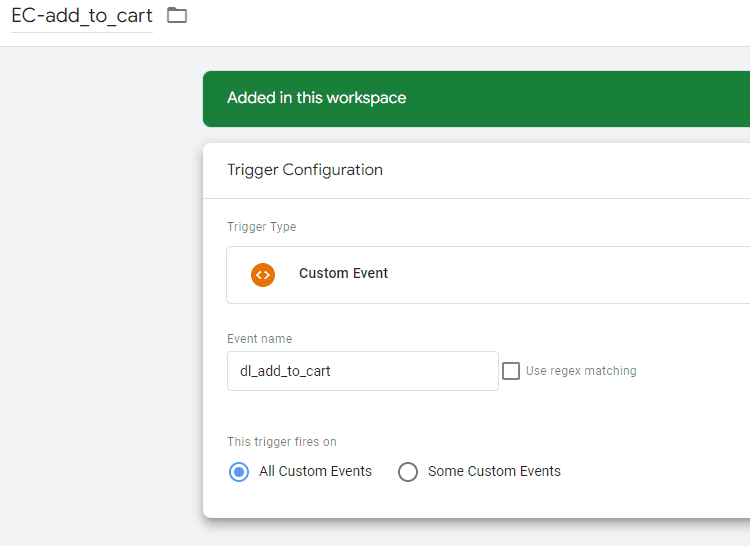
Create trigger
We will create a new trigger that will listen for whenever an event named “dl_add_to_cart” is triggered. Once the event appears in our javascript data layer, our associated tag ( which we will create in the next step ) will be executed.
Create Data Layer variables
Since, we have already created data layer variables for item_list_id, item_list_name, and items[] array. We can use our existing data layer variables.
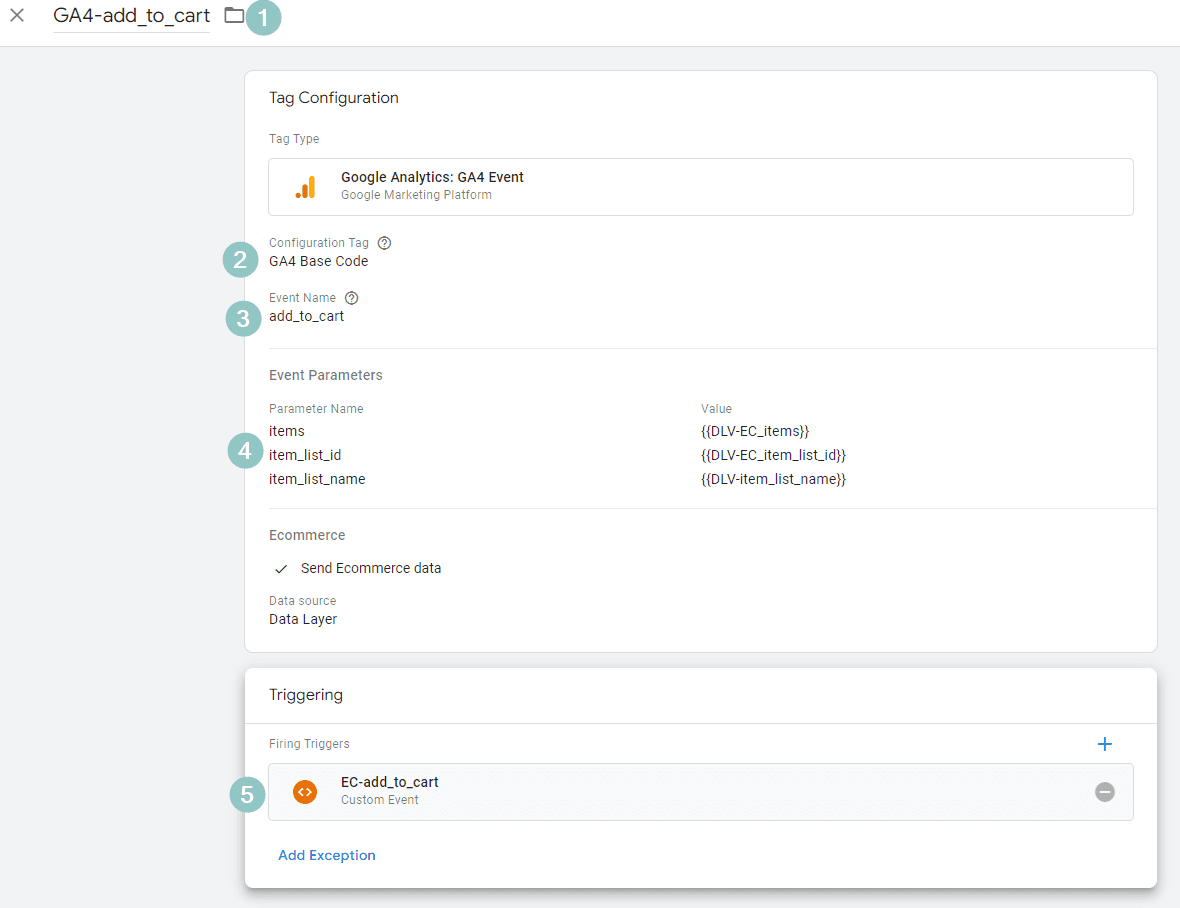
Create tag
Now we will create a tag in GTM. Our tag will read the product information from data layer and send that information to google analytics data stream. Our tag configuration will look like the image below.
- We created a tag named GA4-add_to_cart
- We configured the code to send data to our GA4 base code ( data stream ).
- We have configured that add_to_cart is the event for which we want to send data to google analytics on this tag’s execution.
- Along with the event, we want to send additional parameters of items which will get its value from data layer variable {{DLV-EC_items}} defined above.
- Finally, we have configured the trigger EC-view_item_list which will set our tag to execute as soon as data layer gets an event dl_add_to_cart.
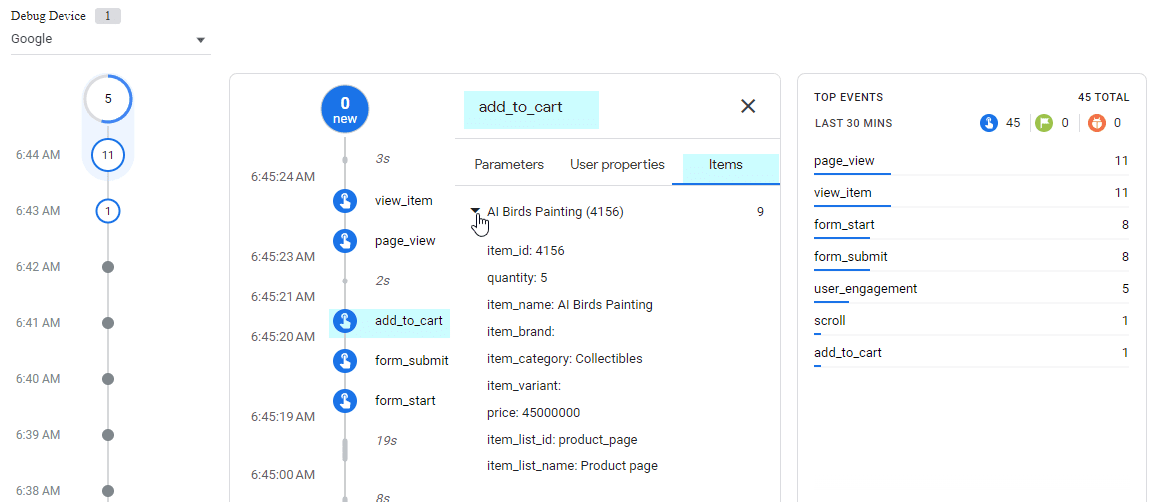
verify the event
Finally, you can verify that the event is being triggered and it is passing the required data to google analytics 4. You can follow this guide to verify the trigger. A quick glance on the google analytics debug mode shows that data is flowing.
Parameter reference add_to_cart
The add_to_cart event parameters are the same as of view_item parameters above.
Parameter reference items[]
Parameters view items[] array are the same as we used in view_item_list above.
Remove from Cart Implementation
The event remove_from_cart is used, when a user removes an item from the cart. Like add_to_cart, an important distinction to keep in mind is between change in product quantity and removal of product from the cart. Change in product quantity is altered by changing parameter value quantity inside the items[] array, whereas if the product is removed from the cart entirely, this shall trigger remove_from_cart event.
Let us go through step by step implementation of remove_from_cart event on our demo store.
1. Server-side code
There are two steps to server-side code for remove_from_cart.
- On the cart page, we want to retrieve product attributes e.g. name, id, price for each product.
- When a product is removed from the cart, we pass the product in items[] array to the data layer.
Server-side code example for Removing Products from cart
//Google Analytics 4 - E-commerce -- Creating DataLayer event for remove_from_cart
// This example uses woocommerce E-commerce platform .
// this example gets few parameters. For complete parameter reference, please see parameter reference section below.

add_action( 'woocommerce_after_cart', 'ga4_remove_from_cart_js' );

function ga4_remove_from_cart_js() {
    ?>
    <script type="text/javascript">
        jQuery(document).ready(function($) {
            $( document.body ).on( 'click', '.woocommerce-cart-form a.remove', function() {
                var product_id = $(this).data('product_id');
                var product_qty = $(this).closest('tr.cart_item').find('input.qty').val();

                if (product_id) {
                    $.ajax({
                        url: '<?php echo admin_url("admin-ajax.php"); ?>',
                        type: 'POST',
                        data: {
                            action: 'get_product_attributes',
                            product_id: product_id
                        },
                        success: function(response) {
                            if (response.success) {
                                dataLayer.push({
                                    'event': 'dl_remove_from_cart',
                                    'ecommerce': {
                                        'currency': response.data.currency_code,
                                        'item_list_name': 'Cart page',
                                        'item_list_id': 'cart_page',
                                        'items': [{
                                            'item_id': response.data.product_id,
                                            'item_name': response.data.product_name,
                                            'item_brand': response.data.product_brand,
                                            'item_category': response.data.product_category,
                                            'item_variant': response.data.product_variant,
                                            'quantity': product_qty,
                                            'price': response.data.product_price
                                        }]
                                    }
                                });
                            }
                        }
                    });
                }
            });
        });
    </script>
    <?php
}
2. Data Layer code
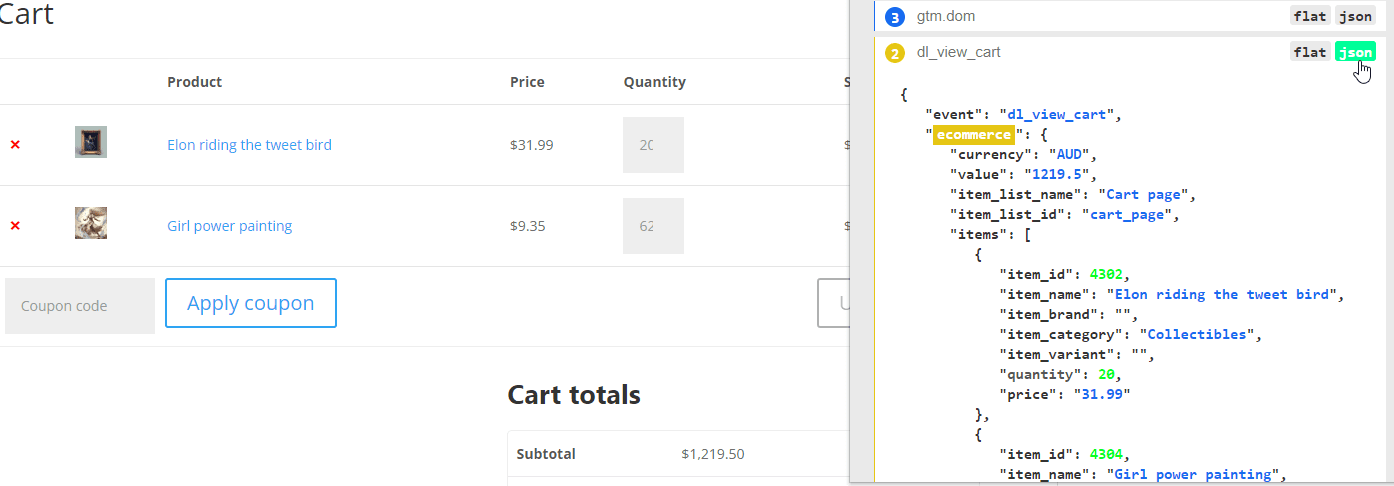
As before, we now need to confirm whether our data layer is receiving an event that we can use to trigger our tag for remove_from_cart. We can use any extension to confirm the event. The screenshot below confirms Data Layer event populated when a user removes an item from the cart.
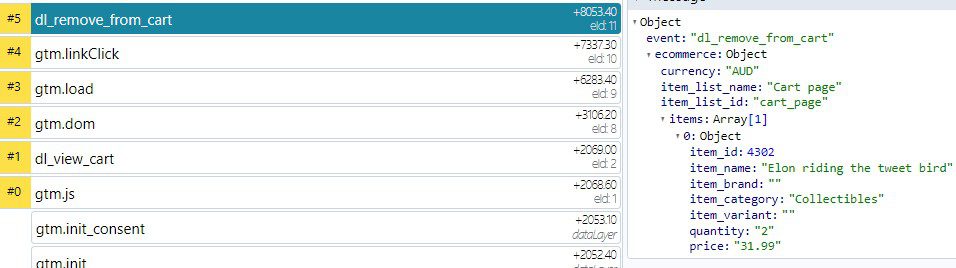
The actual javascript object that is populated in data layer when we selected ( clicked on ) a product is given below
Data Layer code for dl_remove_from_cart
{
   "event": "dl_remove_from_cart",
   "ecommerce": {
      "currency": "AUD",
      "item_list_name": "Cart page",
      "item_list_id": "cart_page",
      "items": [
         {
            "item_id": 4302,
            "item_name": "Elon riding the tweet bird",
            "item_brand": "",
            "item_category": "Collectibles",
            "item_variant": "",
            "quantity": "2",
            "price": "31.99"
         }
      ]
   },
   "gtm.uniqueEventId": 11
}
3. GTM configuration
We have written server-side code to populate Data Layer with event dl_remove_from_cart whenever a user removes item from the cart.
We will now use google tag manager ( GTM ) to read the data layer event “dl_remove_from_cart” and trigger a data push to the google analytics data stream
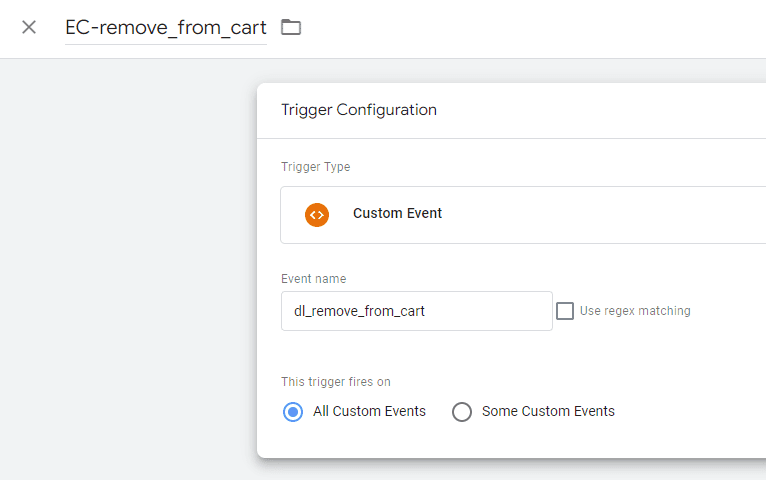
Create trigger
We will create a new trigger that will listen for whenever an event named “dl_remove_from_cart” is triggered. Once the event appears in our javascript data layer, our associated tag ( which we will create in the next step ) will be executed
Create Data Layer variables
Since, we have already created data layer variables for currency, and items[], we do not have to create any new Data Layer variables.
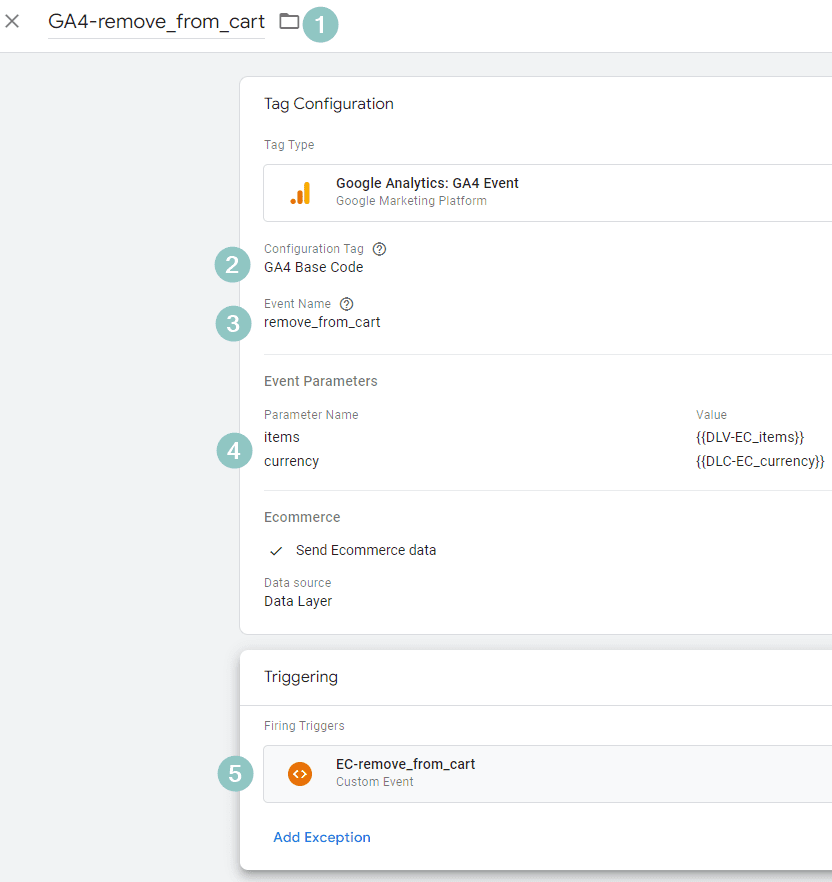
Create tag
Now we will create a tag in GTM. Our tag will read the product information from Data Layer and send that information to google analytics data stream. Our tag configuration will look like the image below.
- We created a tag named GA4-remove_from_cart
- We configured the code to send data to our GA4 base code ( data stream ).
- We have configured that remove_from_cart is the event for which we want to send data to google analytics on this tag’s execution.
- Along with the event, we want to send additional parameters of items that will get their value from data layer variable {{DLV-EC_items}} and {{currency}} defined above.
- Finally, we have configured the trigger EC-remove_from_cart which will set our tag to execute as soon as data layer gets an event dl_remove_from_cart.
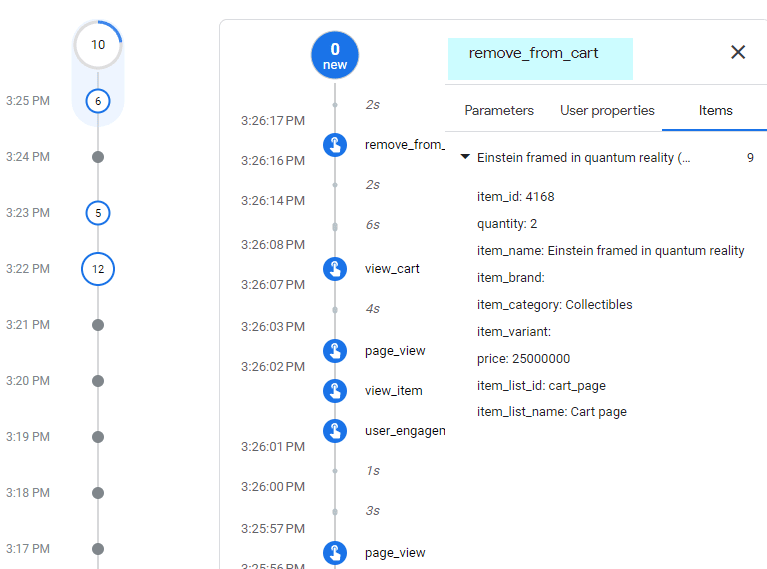
Verify the event
Finally, you can verify that the event is being triggered and it is passing the required data to google analytics 4. You can follow this guide to verify the trigger. A quick glance on the google analytics debug mode shows that data is flowing.
Parameter reference remove_from_cart
The remove_from_cart event parameters are the same as of view_item parameters above.
Parameter reference items[]
Parameters view items[] array are the same as we used in view_item_list above.
View Cart Implementation
The event view_cart is used when a user views the cart page. An example of such page is cart page on our demo store. First, we will write the server code in the website to generate Data Layer code, then we will read the Data Layer code using google tag manager and create a tag. This tag will push the data to our google analytics data stream.
1. Server-side code
There are essentially two steps to server-side code for view_cart.
- When the cart page loads, we get all the content of the cart and create an array to store products and theirattributes e.g. name, id, price, etc. for each product.
- We then pass on this product data using items array to our data layer. The array contains individual products(items) and their associated parameters.
Make sure that a unique item list ID (item_list_id) and a list name (item_list_name) are also passed in the data layer object to identify the product list from others. These attributes can be passed at the item level or at the whole category level. When specified at an item level, category level item_list_id and item_list_name will be ignored.
The server side code below will send event dl_view_cart to our Data Layer.
Server-side code example for view cart
//-------------------------
//Google Analytics 4 - E-commerce -- Creating DataLayer event for view_cart
// This example uses woocommerce E-commerce platform .
// This example gets few product parameters. For complete parameter reference, please see parameter reference section below.

//This action hook fires after cart page is loaded and contents are displayed.
add_action( 'woocommerce_after_cart_table', 'ga4_view_cart_js' );
function ga4_view_cart_js() {
    global $woocommerce;

    $cart_items = array();
    foreach ( $woocommerce->cart->get_cart() as $cart_item_key => $cart_item ) {
        $product = $cart_item['data'];
        $product_id = $product->get_id();
        $product_name = $product->get_name();
        $product_brand = $product->get_meta( '_brand', true );
        $product_category = "Empty";
        $terms = get_the_terms( $product->get_id(), 'product_cat' );
        $product_category = $terms[0]->name;
        $product_variant = $product->get_meta('_variant', true);
        $product_qty = $cart_item['quantity'];
        $product_price = $product->get_price();

        $cart_items[] = array(
            'item_id' => $product_id,
            'item_name' => $product_name,
            'item_brand' => $product_brand,
            'item_category' => $product_category,
            'item_variant' => $product_variant,
            'quantity' => $product_qty,
            'price' => $product_price
        );
    }

    $data_layer = array(
        'event' => 'dl_view_cart',
        'ecommerce' => array(
            'currency' => get_woocommerce_currency(),
            'value' => $woocommerce->cart->get_subtotal(),
			'item_list_name' => 'Cart page',
			'item_list_id' => 'cart_page',
            'items' => $cart_items
        )
    );

    ?>
    <script>
        dataLayer.push(<?php echo json_encode($data_layer); ?>);
    </script>
    <?php
}
2. Data Layer code
As before, we now need to confirm whether our data layer is receiving an event that we can use to trigger our tag for view_cart.
The actual javascript object that is populated in the data layer when we loaded the cart page is given below.
Data Layer code for dl_view_cart
{
   "event": "dl_view_cart",
   "ecommerce": {
      "currency": "AUD",
      "value": "1219.5",
      "item_list_name": "Cart page",
      "item_list_id": "cart_page",
      "items": [
         {
            "item_id": 4302,
            "item_name": "Elon riding the tweet bird",
            "item_brand": "",
            "item_category": "Collectibles",
            "item_variant": "",
            "quantity": 20,
            "price": "31.99"
         },
         {
            "item_id": 4304,
            "item_name": "Girl power painting",
            "item_brand": "",
            "item_category": "Collectibles",
            "item_variant": "",
            "quantity": 62,
            "price": "9.35"
         }
      ]
   },
   "gtm.uniqueEventId": 2
}
3. GTM configuration
We have written server-side code to create an ecommerce object which contains ecommerce object with items array. Array contains attributes of each item available in the cart at the time of cart load. We then populated the data layer with event “dl_view_cart” which contains items and its attributes.
We will now use google tag manager ( GTM ) to read the data layer event “dl_view_cart” and trigger a data push for “view_cart” event to the google analytics data stream.
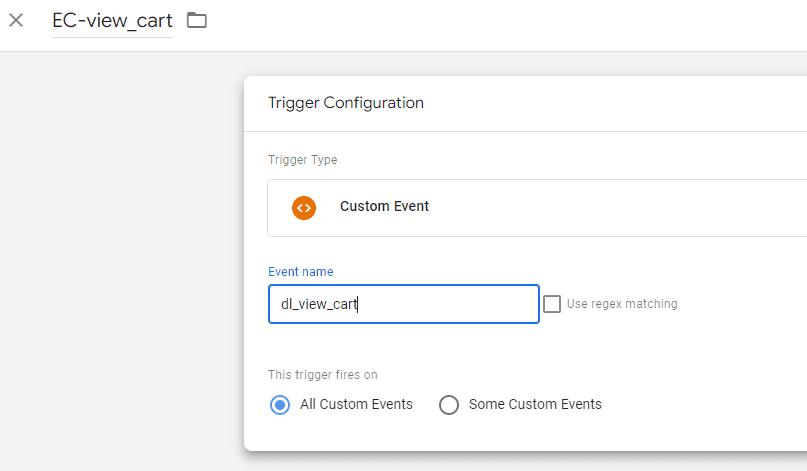
Create trigger
We will create a new trigger that will listen for whenever an event named “dl_view_cart” is triggered. Once the event appears in our javascript data layer, our associated tag ( which we will create in the next step ) will be executed.
Create Data Layer variables
Since we have already created data layer variables for currency & items[] array. We can use our existing Data Layer variables.
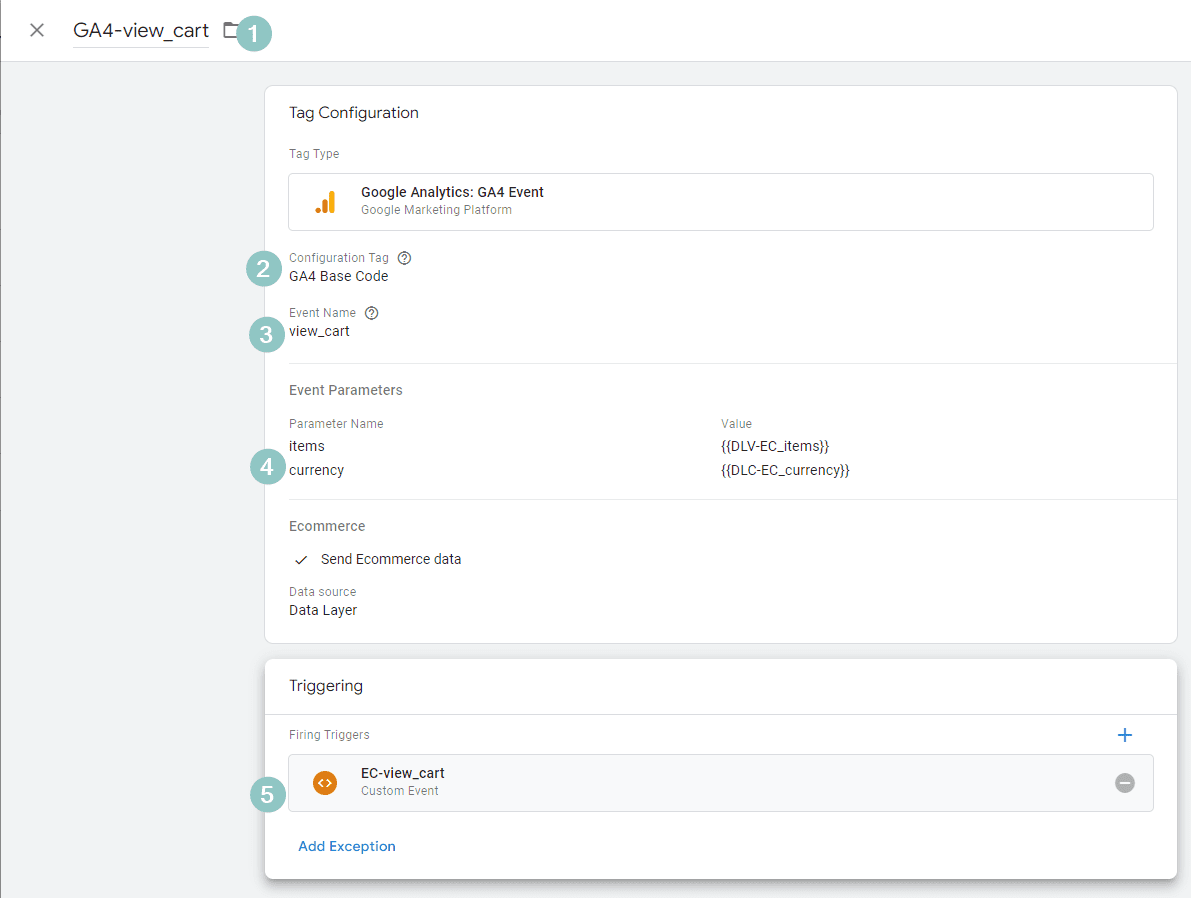
Create tag
Now we will create a tag in GTM. Our tag will read the product information from Data Layer and send that information to google analytics data stream. Our tag configuration will look like the image below.
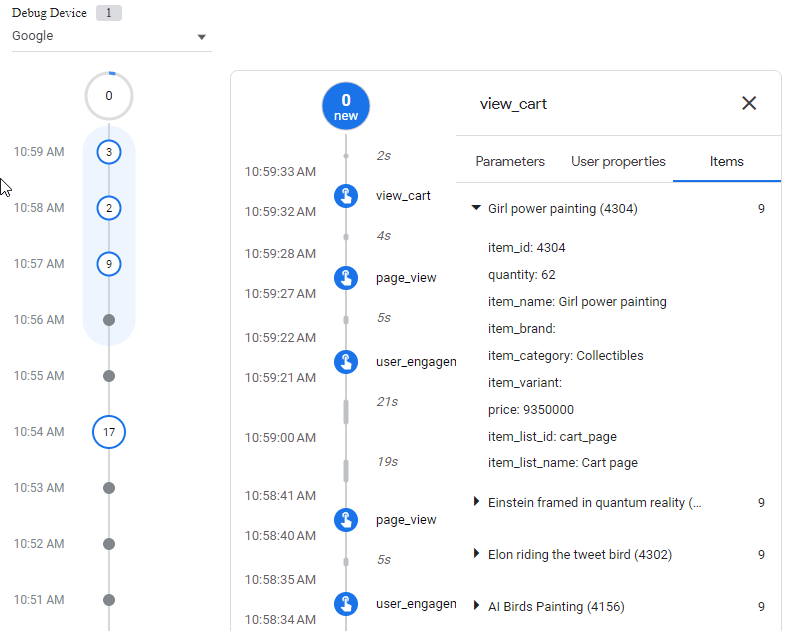
Verify the event
Finally, you can verify that the event is being triggered and it is passing the required data to google analytics 4. You can follow this guide to verify the trigger. A quick glance at the google analytics debug mode shows that data is flowing.
Parameter reference view_cart
The view_cart event parameters are the same as of view_item parameters above.
Parameter reference items[]
The parameter reference for item[] array is same as in view_item_list above.
Responses